If your pajama pants are a little too long, you’re not alone! It’s a common issue, but the good news is, shortening them is a quick fix that can make a huge difference in how they fit and feel. Whether you want your pajamas to hit just above the ankle or you simply want to avoid tripping over extra fabric, this guide will show you how to make that simple alteration—no sewing machine required!
Getting the length right isn’t just about looks—it’s also about comfort. Pajamas that are too long can bunch up or drag on the floor, making it hard to relax. A properly shortened pair will fit perfectly, allowing you to lounge in style without the hassle of too-long pant legs. Let’s get started!
How to Determine the Right Length?
When it comes to shortening your pajama pants, the first thing you need to do is figure out the right length. This is key to getting the perfect fit, and it’s not just about how the pants look, but also about how they feel.
Measuring for the Perfect Fit
- Measure Your Inseam: Use a measuring tape to find the inseam length. This is the distance from your crotch down to your ankle. Make sure the tape is straight along the inside of your leg for an accurate measurement.
- Decide on Your Desired Length: Think about where you want your pajama pants to fall. For a cropped look, you might want them to hit just above your ankle. For a more relaxed vibe, you might prefer them to rest right at the top of your foot.
- Compare the Measurements: Once you’ve decided on the desired length, compare it with the inseam measurement. This will help you visualize where you want to shorten your pants.
- Mark the Length: Use fabric chalk or a washable marker to mark the length on each leg of your pajama pants. Make sure the marks are even on both sides.
- Avoid Surprises: Double-check your measurements before cutting. Measuring twice ensures your pants will hit exactly where you want them, avoiding any length issues after you’ve made the cut.
Considering the Intended Look
Not all pajama pants are created equal, and the length affects the look. If you’re working with tapered pants, shortening them at the hem might mess with how they fit around the ankle, or change how the cuff fits.
Wide-leg pants, on the other hand, might look great with a little extra length, flowing over your feet. Knowing the style you’re working with helps you decide how much to shorten and where to make the cut.
Using a Muslin for Testing
If you’re unsure about how your pants will fit after shortening, consider testing it out with a muslin or Swedish tracing paper. This is like a practice run before cutting into your fabric. It lets you adjust the length and fit without committing to your final fabric just yet. You can try it on, tweak it, and be confident that you’ll end up with pajama pants that fit exactly how you want.
Essential Tools You’ll Need
- Fabric Chalk or Marking Pen: A fabric marking tool is essential. Fabric chalk or a marking pen lets you make clear, precise lines on your pants, which can easily be wiped or washed away later. It’s especially helpful for marking where to cut or hem.
- Measuring Tape: This will help you get the right length. It’s flexible, so you can measure around the pant leg and get an accurate inseam measurement, ensuring that both legs are even.
- Pins: Pins are key for securing fabric in place while you work. You’ll need them to hold your hems or marks steady before sewing. Just be sure to use pins that won’t damage the fabric.
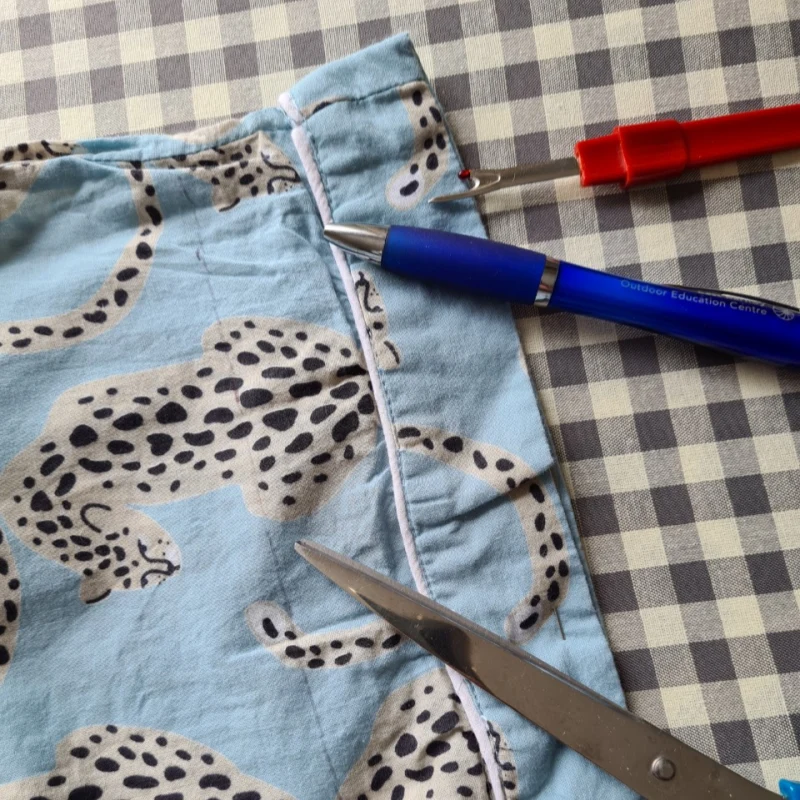
- Sharp Scissors: A good pair of fabric scissors is a must. They’ll help you cut cleanly and accurately, ensuring your pajama pants look neat after your adjustments.
- Needle and Thread: For hemming, you’ll need a needle and thread that match your fabric. Threading the needle might take a little patience, but it’ll give your pants a neat, professional finish!
- Iron: This is optional but highly recommended! An iron helps press down your hem or markings, ensuring everything stays flat and even, which gives your pants a polished, professional look.
Preparing Your Pajama Pants for Alteration
Press the Pajamas Pants First:
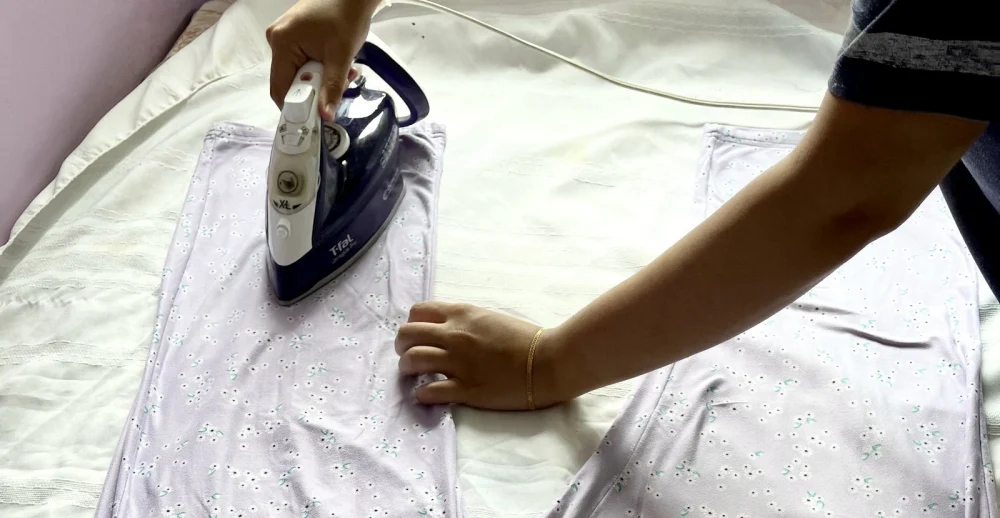
Giving your pajama pants a good press with an iron. This ensures the fabric is smooth and free of creases that could mess with your measurements. Pressing helps you work with clean lines, which makes your alterations much more precise and professional-looking.
Pinning the Desired Length
Fold the fabric up to the length you want and pin it in place. This gives you a clear visual of where to cut, and the pins will keep the fabric from shifting as you mark or sew. It’s a great way to make sure your alterations are even and stay in place throughout the process.
How to Shorten Pajama Pants: The Comprehensive Guide
1. Marking the Length: How to Get Accurate Measurements
Grabbing your measuring tape and fabric chalk. Measure from the current hem to where you want your pants to end—just above the ankle for a cropped look or right at the top of your foot for a more relaxed fit. Mark your desired length on both pant legs. Ensure the marks are straight and even for symmetrical results. Double-check your measurements before cutting to avoid any lopsided alterations.
2. Cutting the Excess Fabric
Once you’ve marked the length, it’s time to cut. Carefully trim just below the chalk line, leaving a little extra for the hem. This extra inch is crucial to creating a secure and neat hem. Cutting too close to the line might make the hem too tight, risking unraveling over time.
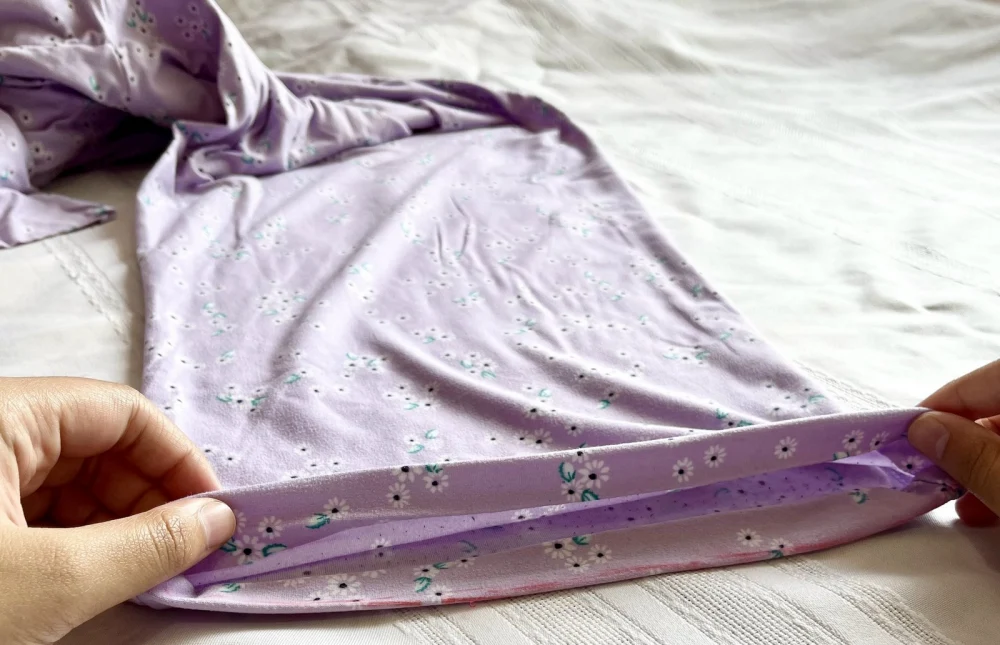
3. Hemming the Pants
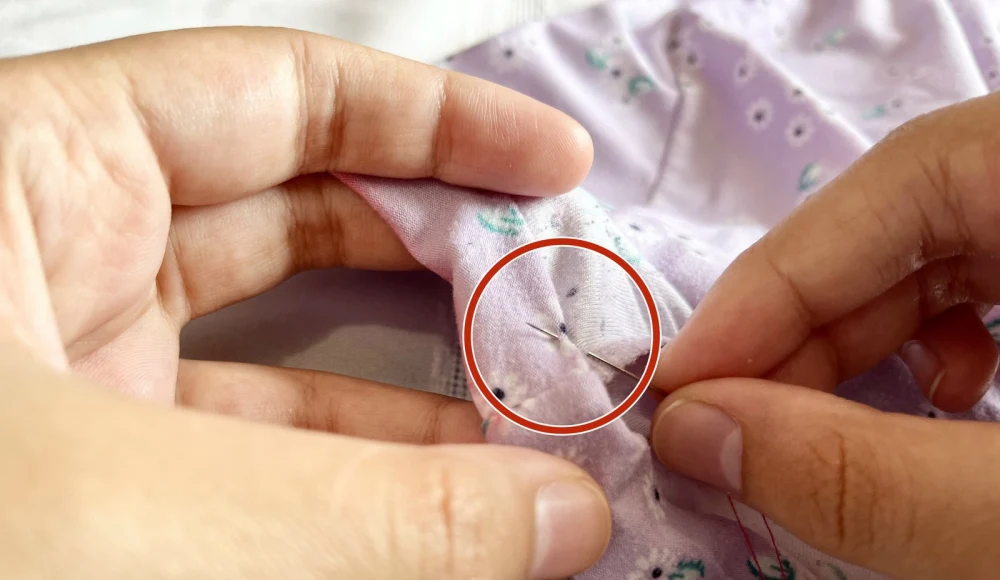
Fold the fabric at the marked line to create the hem. Ensure both sides are even for a clean look. Hand stitching works well for beginners, but if you have a sewing machine, it’s faster and provides a more professional finish. After stitching, backstitch at both ends to secure the hem and prevent it from coming undone.
4. Final Touches: Perfecting the Hem
Lay the pants flat and double-check the length to ensure both legs are even. Trim any stray threads for a clean, polished look. Your pajama pants are now ready to wear!
Troubleshooting Common Issues When Shortening Pajama Pants
Even if you follow all the steps, things don’t always go as planned. But don’t worry—these common hiccups are easy to fix, and soon enough, your pajama pants will fit just the way you want them.
1. Uneven Hems
Uneven hems are a pretty common issue, but they’re simple to fix! If one leg ends up shorter than the other or the hemline looks off, double-check your measurements. Use fabric chalk to re-mark the hem on both sides, making sure they match.
After that, fold and pin everything back in place before you sew. If it’s already hemmed, just take out the stitches and adjust. Take your time—getting everything even will make all the difference!
2. Pants Too Short After Alteration
It happens to the best of us—you’ve cut too much fabric, and now your pajama pants are too short. But don’t panic! One simple fix is to add a cute cuff at the bottom, turning that extra fabric into a stylish feature. If that doesn’t work, try making your hem deeper to get a bit more length.
Or, if you have enough leftover fabric, you can extend the hemline by adding a matching piece. Just be sure it blends well with the rest of the pants.
Final Adjustments and Quality Checks
Checking the Fit After Hemming
After hemming your pants, it’s crucial to try them on and check the fit. Stand in front of a mirror and take a good look at the length. Are they sitting where you want them to? Walk around a bit to make sure you’re comfortable and that they feel right when you move. If the length looks perfect, great! But if not, don’t worry—you can always tweak it a little more to get it just right.
What to Do if the Length Still Doesn’t Look Right?
If the length isn’t quite there after your first try-on, you’ve got options. If they’re too long, you might need to redo the hem and trim off a little more fabric. If they’re too short, try adding a cuff to the bottom to create a cute, stylish feature.
Or, you can make the hem deeper to get back some of the lost length. Don’t be afraid to adjust and experiment a bit—getting the perfect fit is all about making small tweaks until it feels right.
Quality Control Tips
Is your hemline neat and evenly stitched? If you used a sewing machine, make sure the stitching is secure at both ends by backstitching to prevent it from coming undone. If you did any hand stitching, make sure your stitches are small, even, and well-secured. A clean, neat hem will make all the difference in how polished your pajama pants look.
Alternative Methods for Shortening Pajama Pants
1. Using Hemming Tape: The No-Sew Fix
Hemming tape is perfect if you’re in a hurry or just want to skip the sewing. First, measure and mark where you want to shorten your pants. Fold the hem to your desired length, press it with an iron to create a neat crease, and slide the hemming tape inside the fold.
Then, press it with the iron again, following the tape instructions. The heat will bond the fabric together, giving you a clean, no-sew hem. It’s quick, easy, and you don’t even need a sewing machine!
2. Shortening with a Cuff: Add Some Style
Want to add a little flair to your pajama pants? Try shortening them by adding a cuff! First, decide how much you want to shorten the pants. Fold the fabric up, then fold the edge over again to make a small cuff. Pin it in place and stitch it down, leaving some extra fabric for a stylish rolled-up look. Not only will your pajamas fit perfectly, but you’ll also give them a cool, fresh vibe.
3. Fabric Glue for a Quick Fix
If you’re looking for a super-fast fix, fabric glue might be your new best friend. Simply measure and mark where you want to shorten your pants. Fold up the hem, apply fabric glue to the edge, and press the fabric together.
Hold it for a few seconds until the glue sets. It’s perfect for a temporary fix, or if you’re in a pinch and don’t have a sewing machine. Just keep in mind, this won’t last as long as a stitched hem, but it’ll work just fine for a quick alteration!
Caring for Your Altered Pajama Pants
Washing and Storing Pajama Pants: Keep That Fit Intact
Once your pajama pants are altered, you’ll want to wash them carefully so they don’t shrink or stretch out. Always turn them inside out before washing to protect the fabric and your new hem. Stick to cold water and a gentle cycle to minimize wear. When it’s time to store them, hang them up or fold them neatly. Avoid tossing them into a pile—it’ll help keep the hemline looking sharp.
Tips for Keeping the Hem in Place: No More Unraveling
You’ve got that perfect hem in place, so the last thing you want is for it to come undone after washing. To keep it secure, don’t wring out your pants! Instead, gently pat them dry with a towel and let them air dry. If any edges come loose, a quick touch-up with fabric glue or a little re-pressing with an iron should do the trick.
Ironing for a Crisp Finish: Keeping the Look Fresh
Ironing your altered pajama pants helps maintain that polished, fresh look. Set your iron to a low heat to protect the fabric, and gently press along the seams. If you used hemming tape, give it another press after washing to help reinforce the bond. This’ll keep your hem secure and your pants looking sharp.
Conclusion
Now that you’ve got the hang of shortening your pajama pants, it’s time to enjoy tailoring them to your perfect fit. Whether you’re hemming, adding cuffs, or using a no-sew method like hemming tape, it’s all about making sure your pajamas look and feel just right. Take your time—this is your chance to make your pants as comfy and stylish as you want!
If you’re starting with a fresh pair of pajamas, Friendtex has a great selection to help you get the best fit for your alterations. Enjoy the process, and here’s to those cozy nights in your perfectly customized pajama pants!