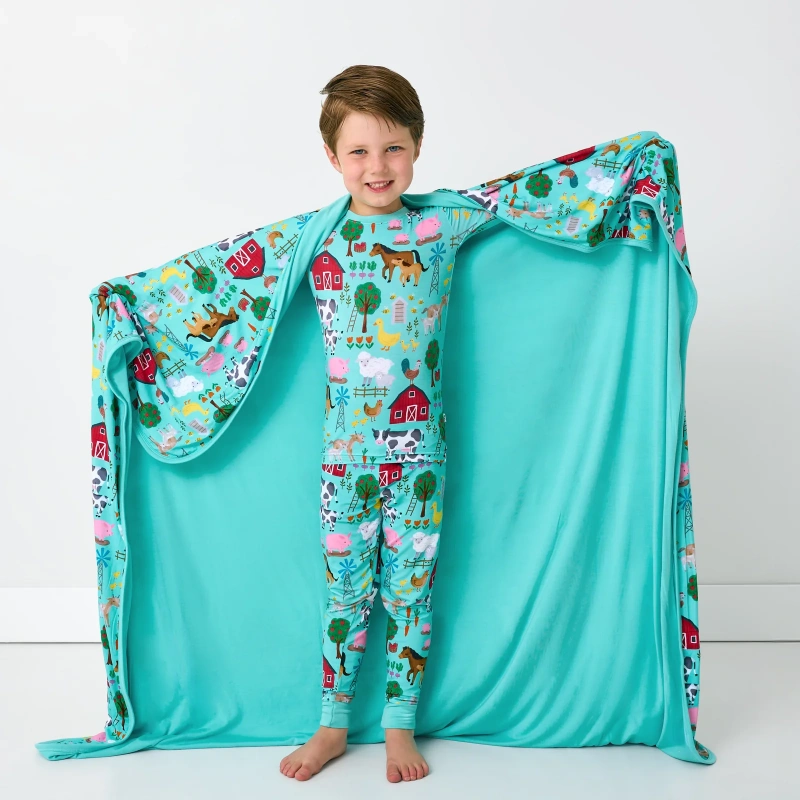
Yes, you can turn a blanket into pajamas at home! If you want to know how to turn a blanket into pajamas or how to make a diy loungewear set, you only need simple tools and a bit of creativity. Upcycling gives you cozy results and helps the planet. Take a look at these numbers:
Insulation Factor | Upcycled Garment | Poly-Wool |
|---|---|---|
Temp Difference | 13.5°C higher | – |
At Low Temp | 2.4°C higher | – |
You get better warmth and comfort from upcycled materials. Want something custom or large-scale? Friendtex can help you bring your ideas to life.
Key Takeaways
Choose a soft, warm blanket like fleece, sherpa, or velvet for cozy pajamas that fit your climate and comfort needs.
Use basic sewing tools and quality materials to make your pajamas durable and easy to sew.
Measure and cut your blanket carefully using a favorite pajama set as a pattern to ensure a good fit.
Sew the pieces inside out, follow a clear order, and finish seams well to create comfortable, long-lasting pajamas.
Upcycling blankets into pajamas saves money, helps the environment, and lets you create unique, custom loungewear.
Materials and Tools
Choosing a Blanket
You want your pajamas to feel soft, warm, and comfortable. Start by picking a blanket that matches your needs. Fleece, sherpa, or velvet blankets work best for a cozy loungewear set.
These materials feel gentle on your skin and keep you warm during chilly nights. If you live somewhere with cold winters, go for a thicker blanket. For warmer climates, a lighter blanket will help you stay cool and comfortable.
Researchers have found that the thickness and type of fabric you choose can affect how well you sleep. Thicker blankets add warmth, while lighter ones help you avoid overheating.
Try to match your blanket’s weight to the season and your personal comfort level. If you want pajamas that last, look for blankets with strong fibers and good color fastness. These qualities help your new pajamas resist wear and tear, so you can enjoy them for a long time.
Tip: Wash your blanket before you start. This helps remove any chemicals and lets you see how the fabric will feel after washing.
Essential Supplies
You don’t need fancy tools to turn a blanket into pajamas, but having the right supplies makes the process easier and your results better. Here’s a quick checklist to get you started:
Fabric scissors (sharp ones prevent fraying and give clean edges)
Sewing machine (a basic model from Brother or Singer works great)
Needles and pins (choose sizes that match your fabric)
Thread (pick a color and weight that matches your blanket)
A measuring tape or ruler
Seam ripper (for fixing mistakes)
Chalk or fabric marker (for marking your pattern)
Elastic or drawstring (for the waistband)
Optional: buttons, zippers, or decorative trims
Supply Category | Recommended Brands/Types | Key Qualities and Features |
|---|---|---|
Fabric Scissors | Gutermann, Fiskars | Sharp, clean cuts, prevents fraying |
Sewing Machines | Brother, Singer | Beginner-friendly, automatic threading, stitch variety |
Needles and Pins | Various sizes | Keeps fabric aligned, fits different fabrics |
Thread | High-quality, color-matched | Durable, seamless stitching |
Sewing Notions | Seam rippers, measuring tools | Accurate measurements, easy fixes |
Eco-Friendly Fabrics | Organic cotton, recycled polyester, bamboo | Sustainable, certified by GOTS and OEKO-TEX |
Choosing quality materials and tools helps your pajamas last longer. Strong fabrics and good tools make sewing easier and your finished pajamas more durable. If you want to make more than one set or need help with custom designs, you can always reach out to a professional manufacturer like Friendtex.
How to Turn a Blanket into Pajamas?
Turning your favorite blanket into pajamas is easier than you might think. You just need a little patience and the right steps. Let’s walk through how to turn a blanket into pajamas, making sure your new loungewear feels as cozy as it looks.
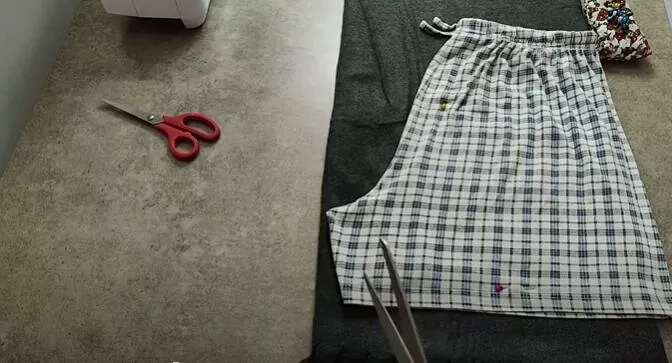
Measure and Mark
Start by laying your blanket flat on a clean surface. Smooth out any wrinkles so you get accurate measurements. If you already have a pair of pajama pants or a comfy top you love, use them as a template.
Place them on the blanket and trace around them with chalk or a fabric marker. Leave about an inch around the edges for seam allowance. This extra space helps your pajamas fit well after sewing.
Tip: Always double-check your measurements before cutting. Research shows that precise pattern-making and repeated fit checks lead to better comfort and long-term wearability. Advanced pattern methods, like those used in professional garment factories, help reduce errors and make sure your pajamas fit just right.
If you want to customize your pajamas, you can adjust the length of the sleeves or pants. Add a little extra fabric if you prefer a looser fit. For the waistband, mark a spot for elastic or a drawstring. This step is key to turning a blanket into pajamas that actually feel good to wear.
Cut the Fabric
Once you’ve marked your pattern, grab your sharp fabric scissors. Cut along the lines you drew, keeping your hand steady for smooth edges. If your blanket is thick, like sherpa or fleece, take your time. These materials are perfect for warmth and comfort, but they can be a bit bulky to cut.
Use high-quality fabrics that match your needs. Fleece, sherpa, and velvet blankets work best for cozy pajamas.
Cut pieces for the front and back of both the top and bottom. Don’t forget sleeves and cuffs if you want them.
If you’re making adjustments, cut extra fabric for pockets or decorative trims.
Research in garment design highlights the importance of careful pattern cutting and fit assessment. This helps your pajamas move with you and stay comfortable, even after many washes. Cutting accurately now saves you time and frustration later.
Sew the Pieces
Now comes the fun part—sewing everything together! Turn your fabric pieces inside out before you start. This way, your seams will end up on the inside, giving your pajamas a clean look. Pin the pieces together to keep them aligned.
Here’s a simple order to follow:
Sew the shoulder seams of the top.
Attach the sleeves to the armholes.
Sew the side seams from the sleeve down to the hem.
For the bottoms, sew the outer leg seams first, then the inner leg seams, and finally the crotch.
Add the waistband, threading in elastic or a drawstring.
Note: Use strong, quality thread and the right needle size for your fabric. Press your seams as you go for a smooth finish. Techniques like French seams or flat-felled seams help prevent fraying and make your pajamas last longer. Topstitching adds strength and a professional touch.
Check your work as you go. Make sure seams are secure and hems lay flat. Avoid redoing seams, since this can weaken the fabric. Trim any loose threads and press the finished garment for a crisp look. These steps are essential in how to turn a blanket into pajamas that you’ll love wearing again and again.
If you want a truly custom fit or plan to make pajamas for others, consider reaching out to a professional garment manufacturer like Friendtex. They use advanced pattern-making and sewing techniques to ensure every piece fits perfectly and lasts for years.
Pajama Top
Cut and Sew Top
Ready to make the top part of your pajamas? Start by laying out the fabric pieces you cut earlier. If you used a favorite shirt or a pattern-free method, you already have the basic shapes. Daisy Braid, also known as DIY Daisy, shares some great tutorials for making tops without patterns.
Her projects, like the DIY Daisy Top and Rosebud Raglan Top, show you how to create simple, wearable tops from any fabric—even a blanket. You can find more ideas in her book “Sew It Yourself” or on her blog.
Line up the front and back pieces with the right sides facing each other. Pin along the shoulder seams to keep everything in place. Sew the shoulders together using a straight stitch. Take your time and keep the edges even. After sewing, press the seams flat with an iron. This step helps your top look neat and feel comfortable.
When you choose your fabric, think about comfort and durability. Studies show that modal and modal-microfiber fabrics offer great strength, breathability, and moisture control.
These qualities matter for pajamas because you want them to last and feel good against your skin. Cotton, silk, linen, and Tencel all have their own benefits, so pick what feels best for you.
Attach Sleeves
Now it’s time to add the sleeves. Lay your top flat and match the center of each sleeve piece to the shoulder seam. Pin the sleeves in place, curving them gently to fit the armhole. Sew along the pinned edge, making sure the fabric doesn’t bunch up.
Flip the top inside out and sew the side seams from the end of the sleeve down to the hem.
If you want a relaxed fit, leave a little extra room in the sleeves. This makes your cozy loungewear set even more comfortable. You can also add cuffs or trim for a personal touch.
Pattern-free sewing lets you get creative, so don’t worry about making everything perfect. The goal is to have fun and end up with pajamas you love to wear.
Tip: Try on the top before finishing the hems. You can adjust the fit or sleeve length if needed. Small changes make a big difference in comfort.
Pajama Bottoms
Refashion a Fleece Blanket
You can easily refashion a fleece blanket into pajama bottoms that feel soft and warm. Start by folding your blanket in half. Lay a pair of pajama pants you already own on top as a guide. Trace around them with a fabric marker, leaving about an inch for seam allowance.
Cut out two pieces for each leg. Fleece works great because it stretches a little and feels gentle on your skin. This makes it perfect for a cozy loungewear set you can wear all evening.
Pin the pieces together with the right sides facing each other. Sew along the outer and inner leg seams. Turn one leg right side out and tuck it into the other leg. Line up the crotch seams and sew them together.
Now you have the basic shape of your pajama pants. Try them on before finishing the waistband to check the fit. If you want a looser style, trim less fabric. For a snugger fit, trim a bit more.
Waistband and Finishing
A comfortable waistband makes all the difference in pajama bottoms. You can choose between a drawstring, elastic, or even both. Many people love elastic waistbands because they stretch and move with you.
Camp High Rocks describes their fleece-lined sweatpants as having elastic waistbands that keep you warm and comfortable, especially on cold nights. Drawstrings add extra adjustability. Buck Mason’s Pima Pajama Pant uses a relaxed waistband with an adjustable drawcord, which gives you a secure fit and lasting comfort.
To make your waistband, fold the top edge of your pants down about an inch and sew around, leaving a small opening. Thread your elastic or drawstring through the channel using a safety pin.
Tasha Miller Griffith found that a simple ribbon drawstring kept her handmade leggings in place all day. Elastic works well for most people, but you can always add a drawstring for extra support.
Finish by hemming the pant legs. Fold the edges up, pin them, and sew a straight line. Trim any loose threads. Now you have pajama bottoms that fit your style and comfort needs. Upcycling a blanket saves money and helps the environment. You get custom-fit pants that feel great every time you wear them.
Finishing Touches
Hem and Edge
You’ve sewn your pajamas, but now you want them to last. Hemming and finishing the edges will keep your pajamas looking neat and stop the fabric from fraying. You have several options, and each one works best for different fabrics and needs. Here’s a quick guide:
Hemming Technique | Effectiveness in Preventing Fraying | Suitable Fabric Types | Durability & Usage Notes |
|---|---|---|---|
Serging (stitching) | High | Most woven fabrics | Gives a professional finish and lasts a long time. |
Zigzag Stitch (stitching) | High | Most woven fabrics | Easy to do at home and holds up well. |
Straight Stitch (stitching) | High | Most woven fabrics | Reliable and strong for everyday wear. |
Nail Polish (no-sew) | Moderate | Thin, lightweight fabrics | Quick fix for delicate fabrics, but not as durable. |
Burning Edges (no-sew) | Moderate to High (synthetics only) | 100% synthetic fabrics only | Melts the edge to seal it, but only works on synthetics. |
Pinking Shears (no-sew) | Moderate | Most fabrics, except some satins, chiffons, boucle | Fast and easy, but not for long-term use. |
Fusible Iron-On Hem Tape (no-sew) | Moderate | Structured, tailored fabrics | Bonds layers together, but may not last through many washes. |
If you want your pajamas to last, go for a sewn finish like a zigzag or straight stitch. These methods work well for most blankets and give your pajamas a clean, professional look. You can use pinking shears or hem tape for a quick project, but sewn hems hold up best over time.
Tip: Always press your hem with an iron before sewing. This helps you get a crisp, even edge and makes sewing easier.
Fit Adjustments
Getting the right fit makes your pajamas feel amazing. You don’t need to be a pro to make simple changes. Start by trying on your pajamas and looking for spots that feel too tight or too loose. Use these steps to help you adjust the fit:
Make a test version (called a muslin) to check the fit before finishing your pajamas.
Look for wrinkles or bunching to spot where you need to adjust.
Change the length or width if the sleeves or legs feel off.
Add or remove fullness for a better shape.
Keep notes in a journal so you remember what changes worked.
Focus on a few key adjustments to keep things simple.
Over time, you’ll learn what works best for your body.
You can also use features like elastic waistbands, wide pant legs, or raglan sleeves to boost comfort. Many people find that loose-fit pajamas feel cooler and let them move more freely.
Wearer trials show that people rate loose pajamas as more comfortable, especially when sitting or moving around. If you want even more comfort, try adding a front opening, a large neck hole, or extra room in the back and shoulders.
Remember: Your pajamas should fit your body and your style. Don’t be afraid to make changes until they feel just right!
Conclusion
You can turn your creativity into comfort by learning how to turn a blanket into pajamas. This project is fun, affordable, and perfect for beginners. Upcycling offers real benefits:
Saves money and supports eco-friendly values
Reduces waste and conserves resources
Follows a circular economy model for sustainable living
Share your new pajamas with friends or ask Friendtex for help if you want a professional touch. Enjoy the satisfaction of making something unique and sustainable!
FAQ
Can I make pajamas from any type of blanket?
You can use most blankets, but fleece, sherpa, or velvet work best. These fabrics feel soft and cozy. Thin or stretchy blankets may not hold their shape as well.
Do I need a sewing machine to make blanket pajamas?
A sewing machine makes the job faster and neater. You can sew by hand if you don’t have one. Just use small, tight stitches for strong seams.
How do I wash my new blanket pajamas?
Wash your pajamas in cold water on a gentle cycle. Use mild detergent. Air dry or tumble dry on low. This keeps the fabric soft and helps your pajamas last longer.
What if I want to make more or need custom designs?
If you want to make several sets or need special designs, you can contact Friendtex. They help with custom garment production and offer professional support for your creative ideas.